The CMW team is currently undergoing a huge research project that includes collecting and testing scores of commercially available clay bodies to help our students understand how their clay bodies perform to make their studios the best that they can be.
Clay body profiling can provide us with valuable information about the fired and green performance of a clay body so that we can optimize your working relationship with that clay body.
Through a process called a firing curve, samples from a clay are fired in a series of increasing temperatures, so we can see how the body evolves through the firing process and how a single clay body behaves when fired to different temperatures. This process also shows us key insights including vitrification, absorption, density, shrinkage, thermal expansion, and material burn-off.
Try CMW’s Commercial Clay Body Profiling Testing FOR FREE
Sample Preparation
We begin the clay body profiling process by creating a sample of small cylinders, or pucks, of clay. This is done by pressing plastic clay or slip casting into a cylindrical mold. The pucks are then dried, and the mass and dimensions are taken and documented. In total, we prepare 40 pucks of each clay body.
Firing
The samples we collected were fired with three major kiln programing methods.
First, all clays were fired in 50⁰C increments, from 800⁰C -1315⁰C (1472⁰F-2399⁰F) in a custom-built Fredrickson Kiln Company electric, oxidation kiln, fitted with a calibrated S-Type thermocouple and a Bartlett Genesis controller. The firing cycle was a simple custom program. 300⁰C per hour to 100⁰C under peak temperature, then 60⁰C per hour to the designated peak temperature with a 5-minute soak
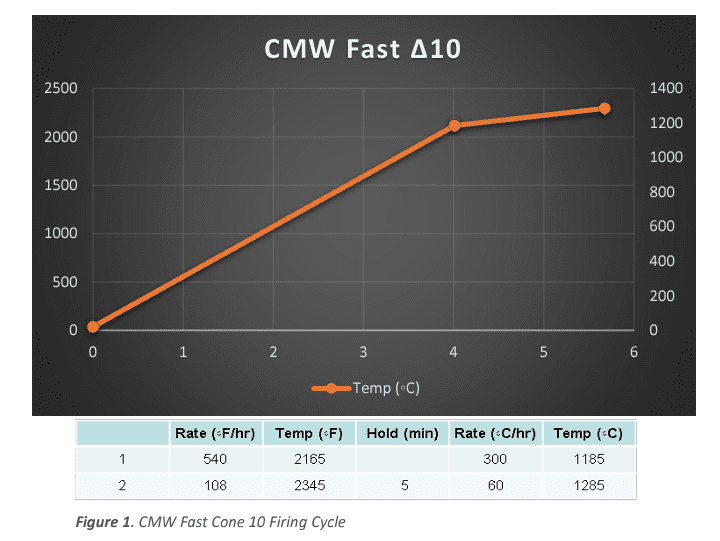
The next type of firing was based on the established firing profiles in the Bartlett Genesis controller. All samples in that series were fired collectively in a series using the Bartlett Genesis “Medium Glaze” Firing 0 200 400 600 800 1000 1200 1400 0 500 1000 1500 2000 2500 0 1 2 3 4 5 6 CMW Fast ∆10 Temp (◦C) Figure 1. CMW Fast Cone 10 Firing Cycle Cycle.
 The particular temperatures used were based on the manufacturer’s listed temperatures. Along with an ∆020, ∆08 and ∆04 firing, for minimum temperature and generic bisque references. The actual temperatures vary depending on the samples being fired, but a general list is ∆5, ∆6, ∆8, and ∆10.
Try CMW’s Commercial Clay Body Profiling Testing FOR FREE
Additionally, samples were fired in a reduction firing, in a Blaauw, computer-controlled gas kiln, fitted with S-Type thermocouples, using both firing profiles listed previously. The variation being that samples were fired only to peak temperatures over 1150⁰C. Additionally, a body reduction step was added to each firing from 950⁰C to 1050C⁰C and a neutral atmosphere for the remainder of the firing.
Post Firing
After firing, we again documented the mass and measured the dimensions of the pucks. We then measured cold and boiled absorption, with a 24-hour soak and 5-hour boil respectively, with distilled water.
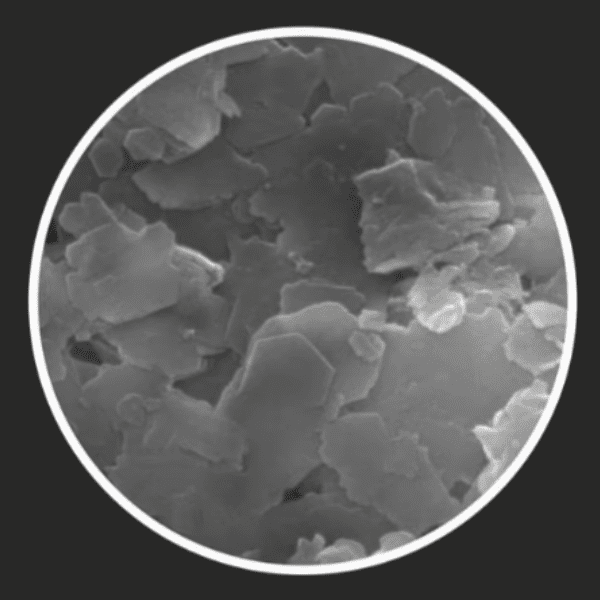
Additionally, we utilized the Archimedes Method to use the physics of liquid displacement to measure density. Density is not a metric that is commonly discussed in the clay community but is an extremely valuable scientific metric. Possibly more valuable than absorption.
We also used a variation of Archimedes Method, to calculate the unfired properties of the clay. As clay can be soaked in Kerosene without physically decomposing. We can place unfired clay samples soaking in kerosene in a vacuum chamber, to take Archimedes measurements, of the unfired clay.
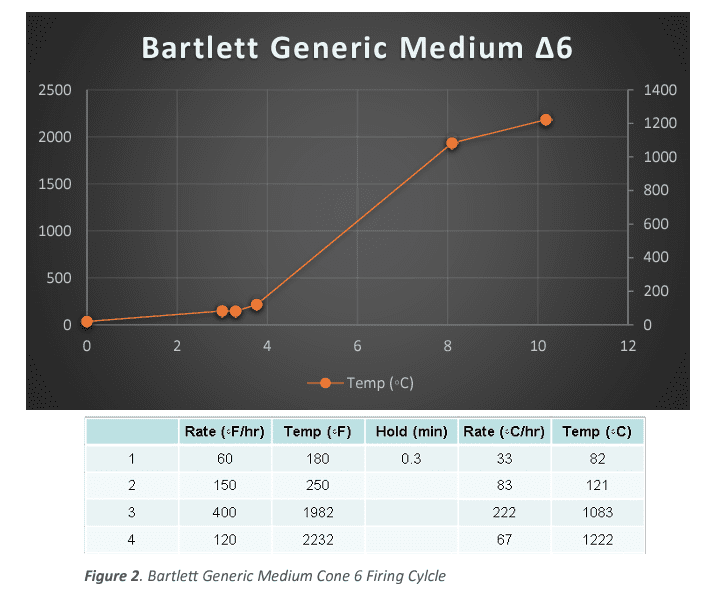
Lastly all samples were run through a Dilatometer (Orton Model: DIL 1410 STD), which measures the Thermal Expansion of the sample. Each clay body had thermal expansion measured from a sample that was fired in the “Bartlett Medium Glaze” firing profile, to the manufacturer’s recommended firing 0 200 400 600 800 1000 1200 1400 0 500 1000 1500 2000 2500 0 2 4 6 8 10 12 Bartlett Generic Medium ∆6 Temp (◦C). Bartlett Generic Medium Cone 6 Firing Cylcle temperature. If the body had a firing range listed, instead of a single temperature, thermal expansion measurements were done at both the high and low temperatures listed.
But wait… I just want to know how to find my clay body’s absorprion! Watch CMW’s YouTube Channel, Self-Absorbed | How to find your clay body’s absorption
Data Collection
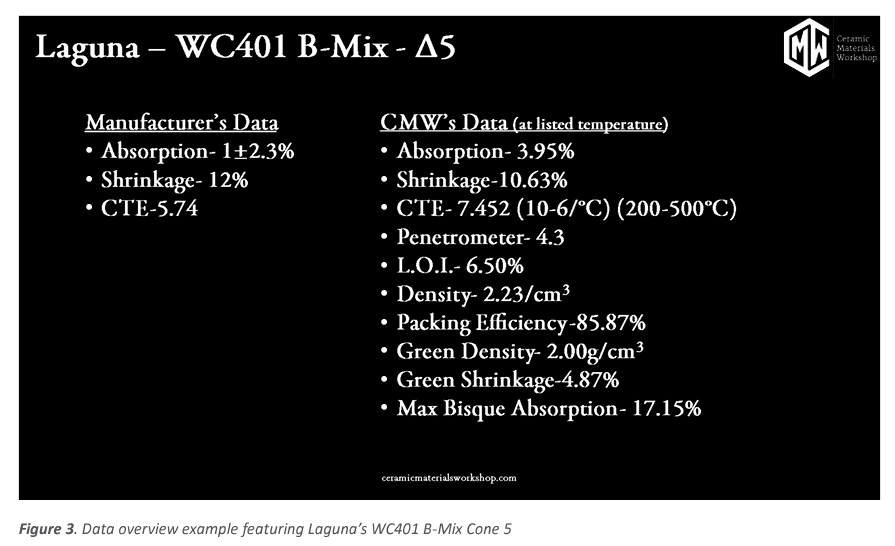
We collected and calculated the data on the different firing temperatures, where we plot the data points versus the firing temperature to produce a graph that displays the information we are after. In the figure below we show the manufacturers data provided to the customer along with the data Ceramic Materials Workshop has collected while doing the clay body profiling.
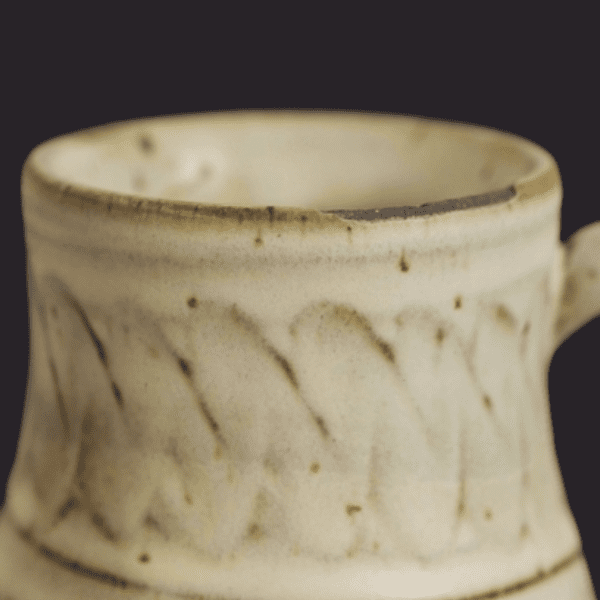
Through the testing we are able to provide many useful data points on clay bodies that help make educated decisions on how this clay body will perform using its fired and green (unfired) characteristics. We also provide a series of photos at each temperature for a visual reference. 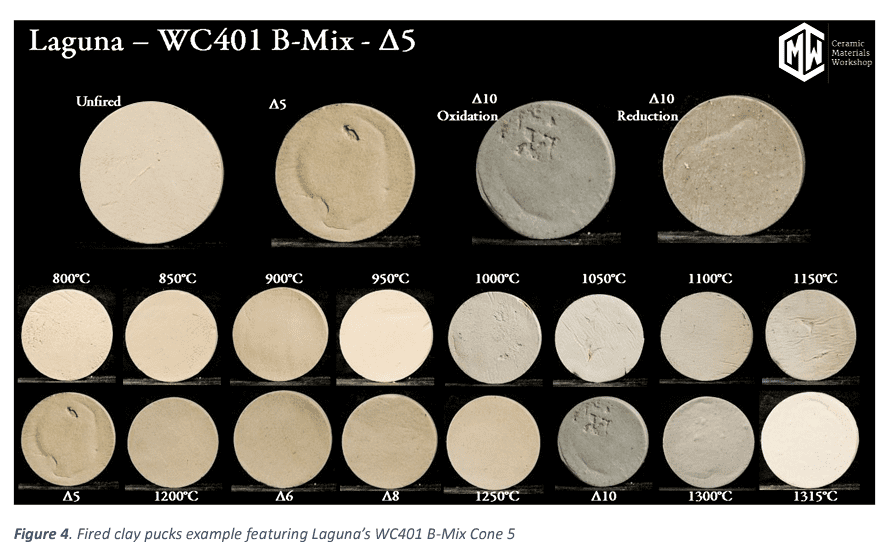
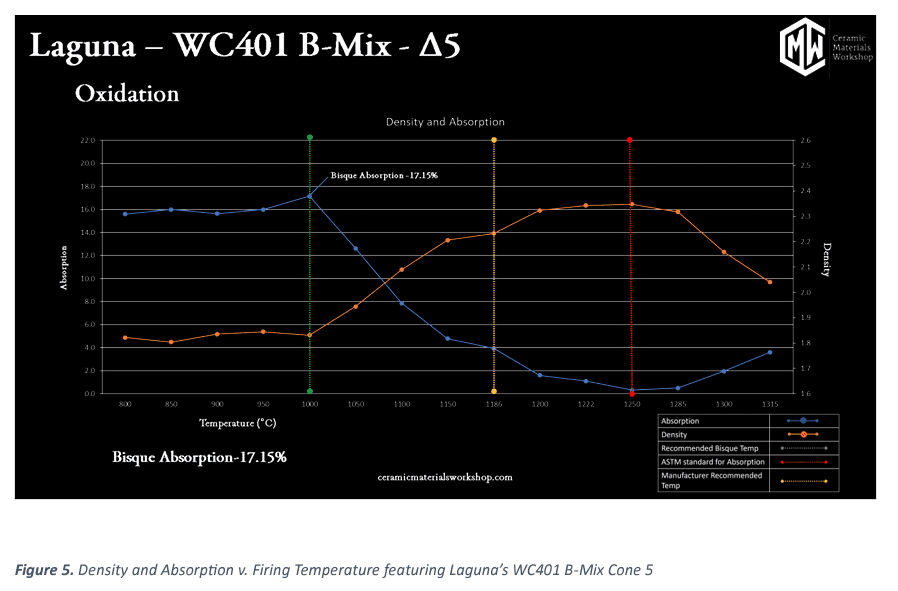
The graph of primary value can be seen in the figure below This graph documents “Density and Absorption v. Firing Temperature.” along with key insights of what are ideal bisque and glaze temperatures for our clay.
Data Interpretation
The absorption line in the graph (blue) shows minor variations very early in firing temperature, but levels off for a good range of temperature before the vitrification process begins. This point is important because it enables us to select a bisque temperature that occurs before the vitrification process starts. This point also means that the absorption of our bisque ware will remain consistent despite variations of hot and cold zones in a kiln during bisque fire.
Consistent bisque absorption provides repeatable glaze application, which will provide repeatable glaze results. As a general rule we recommend a maximum absorption rate for both bisque temperature and an absorption rate under 0.5% for peak firing temperature. As the vitrification process occurs, we see absorption drop as surface pores are closed off and can no longer take on water.
For a well fired clay body, we like overall absorption to pass below 0.5% at, or approaching, the final firing temperature. In the density line (orange) mirrors much of the values that we see in the absorption line. This is not always the case, we see the vitrification reaction taking place as grains grow and voids close, densifying the puck. We then see the temperature at which the reaction is complete: the line levels off, and the clay is no longer densifying towards the theoretical limit.
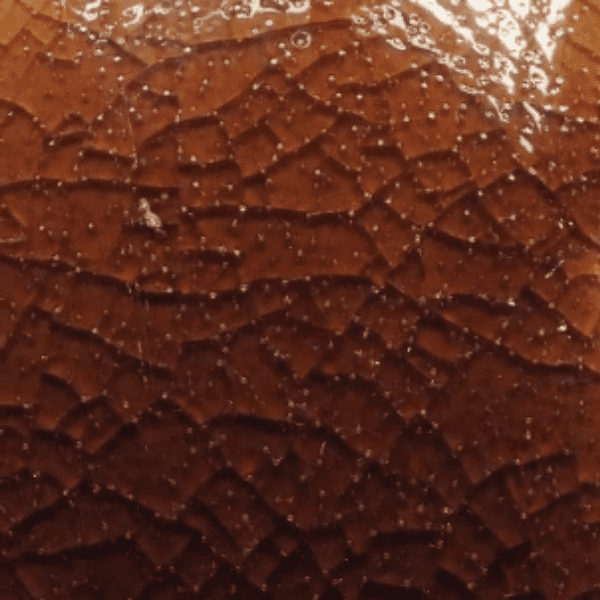
Past the ideal temperature, we see both the absorption value increasing and the density value increasing. This is a sign that the body is bloating. As the remaining pores are swelling and inherently increase absorption of water and decreases density. This is not a bad thing. All clays (including porcelain) will bloat if over fired. The question is, when does it bloat occur in correlation to the recommended firing temperature.
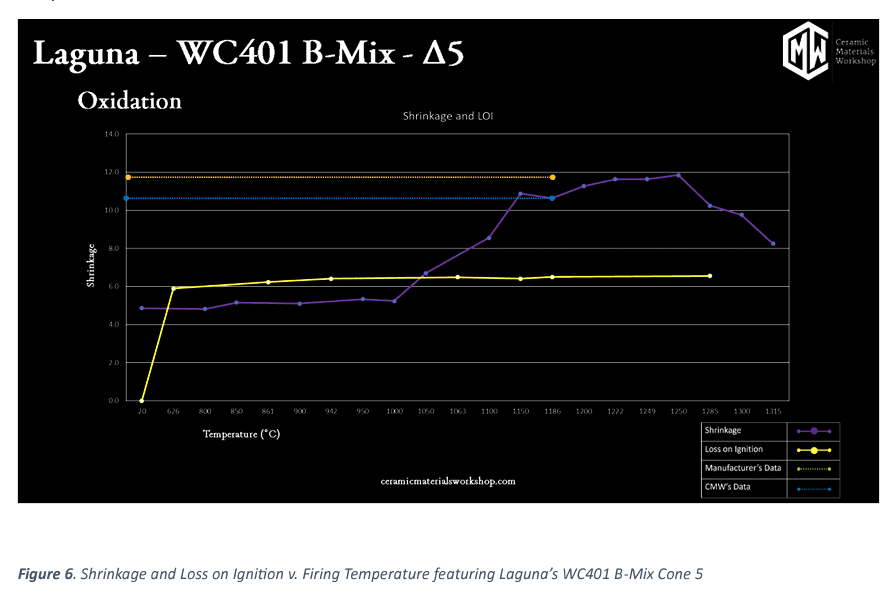
In the figure above, this graph illustrates “Shrinkage and LOI v. Firing Temperature.” LOI (yellow line), or Loss on Ignition, is the metric of what “burns out’ of a clay upon firing (Although “burn out is a bit of a misnomer, as most of what is happening is chemical decomposition of chemically bound water, carbonates, and other temperature sensitive components). L.O.I. is calculated by the difference between the mass of the dry, unfired puck and the final, fired puck. What we typically see, is that almost all the loss happens before Δ020, with some final material burning off at by ∆012.
For shrinkage, we see minimal shrinkage occur in the early stages, this is normal, as there is very little shrinkage, between raw and bisque temperature (>1%). After the bisque stages, shrinkage increases rapidly before leveling off again as the clay goes through the verification process. After the peak shrinkage, we see the shrinkage values go down again. That is because of the bloat reaction, referred to in the density and absorption section. As the pores swell, their volume increases, which reduces the total shrinkage. This may seem like a benefit, but it is in fact something to be avoided, as bloating is a major problem for body durability.
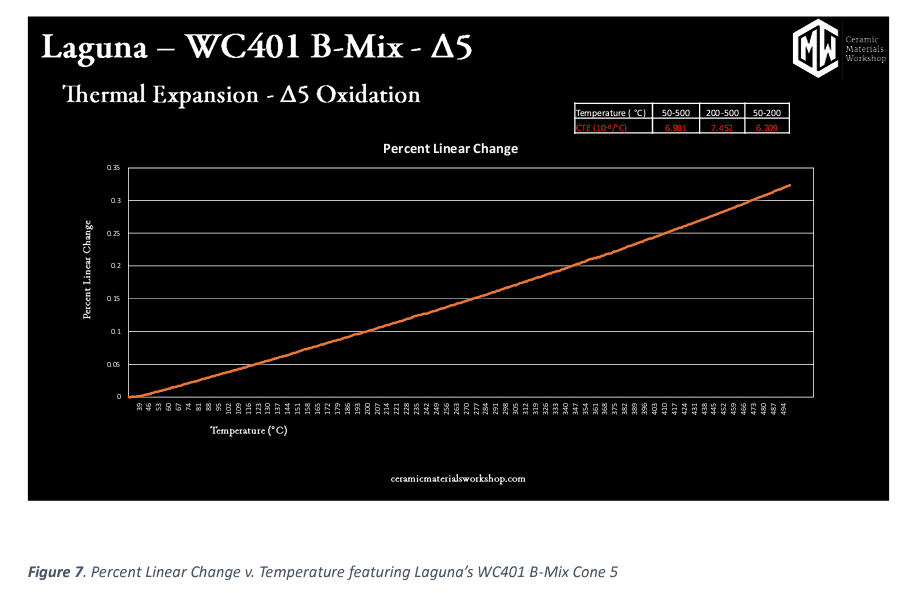
In the figure below we see thermal expansion values. This is generated in a piece of equipment called a dilatometer. A dilatometer is a scientific instrument that measures the literal expansion of clay body samples as they are heated. Dilatometers measure linear change by using heat and a push rod to measure how much the sample expands as it is heated to 500⁰C. The graph also tells us the Coefficient Thermal Expansion or CTE of the clay sample. This information is valuable in determining a clay body and glaze “fit” or in correcting crazing or dunting/shivering problems.
Try CMW’s Commercial Clay Body Profiling Testing FOR FREE
Conclusion
Some potters and industrial manufacturers perform these individual tests at their firing temperature to see if their clay is meeting production standards for absorption, shrinkage, and density. A clay body profile tells the full story of what’s going on in the usually windowless box of a kiln. It helps us to answer questions like: am I bisque firing this clay to the proper temperature, or is my Δ6 clay actually a Δ10 clay? To truly know everything that is going on with our clay bodies, to know how to optimize firing, or to know if a clay body is best left to a forgotten recipe book, we need clay body profiling.
To view the results of our ongoing study, click here.
Can’t Get Enough?
Can’t get enough? We can’t either which is why we made a video on How to make a plaster slab for clay body testing!
Ready to dive deeper?
Loved learning about ceramic glazes? Want to go even deeper? Check out our Workshops & Courses, now available in Spanish, or YouTube Channel where Matt breaks it all down, myth-busting and Stull chart included!


